Friday 16 November 2018

Battle of Plataea - 479BC

Over the years I’ve put on various scenarios of the Greek-Persian wars, as I've had difficulty translating Thermopylae and Salamis to the tabletop, the battle of Plataea seemed like the next obvious choice:

You can find previous battle reports here
http://micromegasatwar.blogspot.com/2012/02/greek-persian-wars-march-of-10000.html
http://micromegasatwar.blogspot.com/2011/12/greek-persian-wars-phase-1-battle-of.html

Over the past couple of months there’s been renewed interest at our club in large ancients battles, mainly kicked off our member Mark’s interest in Hail Caesar. More recently I’ve taken on the mantle with the battle of Asculum (report coming soon) and this battle. My goal is to put on a large battle about once a quarter, our club plays a lot of games at different scales and it's nice to get all the toys out every once in a while.


I won't review the history of the battle, I made the following army lists using Lost Battles, by Phil Sabin and the following article:  http://www.academia.edu/18539535/The_Battle_of_Plataea_479_BC_Strategy_tactics_opposing_armies_strategic_and_battlefield_maneuvers_analysis_of_the_conflict

The armies were pretty closely matched in their effective fighting capability (I am ignoring the mass numbers of levy infantry or camp followers that didn't play a part) and I tried to reflect this in the lists, giving the Persians a slight points edge, the Greek notably had no cavalry.


The terrain is a tricky one as there's a lack of clarity of the position of the armies; I generally started the Greeks spread out but on top of hills and the Persians crossing the river in unison. the river was just treated as rough terrain for the purpose of the battle. The trick for the Persians is to use their cavalry and shooting to get in and behind the Greek lines of heavy infantry. The battle was roughly laid out according to the following map:


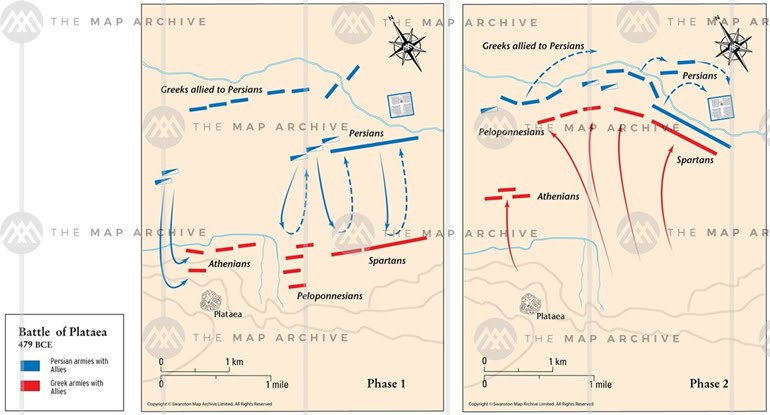
The Spartans are lined up on the Greek right, the Greek allies in the middle and Athenians on the far Left, all spread out with big gaps between the forces. The Persians advance en masse across the river.


In the middle the Persian reserve make a rapid advance and rain down arrows on the Greek skirmishers.

On the Persian far right, the Theban allies advance towards their nemesis Athenians who have parked themselves on top of the hills.

Somewhat ahistorically, the Immortals and heavy cavalry of the Persians hold back on attacking the Spartans, preferring to use their arrows to whittle them down.

Athenians staring down the traitor Greeks, exchanging skirmish fire.

The Allied hoplite division stands their ground and refuses to charge into the Persian infantry for fear of being disordered. Their skirmishers take the brunt of Persian arrows that darken the sky.

On the right, the Thebans hoplites charge up hill and get stuck in against the Athenians, the Persian medium infantry moves up to support

The fighting between the Thebans and the Athenians is intense and swings back and forth.

Meanwhile in the middle the Allied hoplites begin their advance only to find the Persian infantry retreating and firing more arrows.

The Immortals are finally ordered to advance and charge the Spartans.

The Spartan line is damaged but stands firm and throws back the Immortals.

The Thebans and Greek mercenaries are decidedly defeated on flee the field, with the entire division broken, the Spartans standing and the Greek allies making advance in the middle the game was called in favour of the Greeks.


There you have it, the game was quite historical, unfortunate for me as the Persian commander and fun by all standards. We had 8 players total; 3 commanders and a CinC on each side, we started rolling dice at 1:30pm and were done at 4pm, leaving plenty of time for a bit and a pint at the local pub.


Friday 2 February 2018

The Invasion of Scipio - Epilogue - the Bug Hunt

Three months after the final battles of the invasion...
 
 
Much of the valley is ruined but the rebuilding process has begun as remediation teams and scientists move in to clear out the infested zones. Even though the invasion was repulsed there are still reports of bug siting and activity, particular in the city of Flavius where the final ground assault took place. Elements of the bug forces fled and hid underground after their armies were broken and destroyed.
 
The hero of the battle for the Eastern Valley, Leeroy, has been given the assignment of leading a special task force to hunt down and clear bugs from the industrial complexes remaining in tact in Flavius. There have been reports of a possible Alpha bug lurking in the ruins that has killed some field crews working in the area.
 
Leeroy's squad is tasked with clearing the area and reporting back, they will deploy in the blue area shown below. Central intel has pointed out possible spawn points where sitings have occurred, they are identified on the map in red.
 
Having learned from previous fights with the bugs; Leeroy's squad has been heavily armed with carapace armour, a meltagun, a plasma rifle, a heavy flamer and the omnipresent lasgun. Leeroys troops deploy behind cover expecting an attack from any angle.
 
Upon detecting the intruders, the hive mind springs into action and a bug warrior immediately engages the Imperial squad with its venom cannon.
 
The venom cannon downs the Meltagun trooper, James, with a serious injury, the plasma gunner, Tim, steps up and gives two wounds in response to the bug.
 
Meanwhile, the alpha bug and other xenos activate and move towards the intruders.
 
The Imperial troops on the far flank are staring down a ravener bug coming straight for them, luckily, Bob, is armed with a heavy flamethrower.
 
Another warrior steps up to fire upon the Imperial troops as it advances.
 
Both sides exchange inconclusive fire, the venom bug takes its third wound and becomes splatter.
 
The action gets hot and heavy as Leeroy uses his time-honoured tactic of throwing krak grenades at the bugs, his first throw misses but does enough to pin it. James is still down with his serious injuries and he can't be reached because he's out in the open.

The ravener peaks its head around the corner to chew on some Imperial trooper.
 
And takes a mouthful of flames instead from Bob's mobile BBQ maker.
 
Meanwhile Leeroy's loads up another krak grenade, taking advantage of the bug being temporarily stunned.

The bug eats the grenade, taking a serious injury in the process, unfortunately it wasn't fatal.
 
Meanwhile the heavy flamethrower is making some bug roast on the other side and Bob is helped by a veteran guardsman, Neal, who finishes off the downed bug with his combat blade. Neal takes the head as a trophy.
 

All of this distraction has given the Alpha bug enough time to sneak up and unload a barrage on the Leeroy's troopers. Concentrated return fire manages to stun it temporarily. Poor James had succumb to his wounds.

In the last turn of the game, the Alpha charged at Leeroy but not before he had a chance to throw his final Krak grenade at point blank range. The lucky grenade must've found a weak spot in the armour because it took down the big bug in one shot. The last remaining bug fled before the other troopers had a chance to respond.

The work to rebuild Flavius would continue but no one knows what kind of horrors are still hiding in the dark corners of the crowded industrial hive.

 Final Thoughts on the campaign:
- I really enjoyed running and playing this campaign. I've had various inspirations from popular sci-fi movies and shows but my primary motive was to add narrative and story to my tabletop gaming, breathing life into the battles.
- I am going to start another campaign later this year (as soon as the miniatures are painted). The next one will have more structure to it and will be fought over three maps rather than one.
- Thank you all for the likes and comments on various forums and Facebook.

Tuesday 16 January 2018

The Invasion of Scipio - Chapter 7 - Hive Ship Assault on Mago

The invasion of Scipio has been repelled:
http://micromegasatwar.blogspot.ca/2017/10/invasion-of-scipio-chapter-5-second-wave.html

The xeno fleet is in full retreat while the Imperials were taking stock and rebuilding their orbital defences to prevent another invasion taking them by surprise. 

Whie conducting mop up operations, Imperial scout ships have found unusual activity on the opposite side of Mago, the next closest planet to Scipio.
 
Upon closer inspection of the anomaly, Imperial scanners picked up the possible presence of a large xeno presence. It is thought that this is where they staged their invasion, using the uninhabitable planet Mago to shield their activity.
 
A large xeno space station, the mother ship, is thought to be the command and control centre of the entire hive fleet. If the Imperial forces can destroy it, it could mean the end of the hive, the negation of future threat and vengeance for the damage done to the Delta Valley.
Hive mother ship orbiting the far side of Mago
The Imperial fleet prepares itself to conduct the counterattack. They take what ships are remaining or serviceable and organise their fleet.

This scenario will be played with Dropfleet Commander, however, there will be no ground objectives, this will be a straight up spaceship fight. Rhe destruction of the space station, which counts as a critical location, being the main aim of the Imperial troops, winner will determined by kill points. I gave the Imperial troops a 100 point advantage but also gave the Xenos a large station with 16 hull.


Imperial troops deploy in a battle line, focusing their heavy ships on their right flank

The xenos, although reduced in number, send in everything they have to defend their most valuable asset, the hive mind aboard the station.

The opening salvos are fired on the right flank of the Imperial troops, the New Cairos use their burn through lasers to open up on the a pair of Strix xeno cruisers and cause serious damage, but also take a beating from the close action weapons in return. The xenos seeing that their left flank is outnumbered reinforce it with their main battlegroup.

Imperial troops launch bombers against the deadly cruisers, these are countered by the superior fighter launch assets that the xenos have.

In the next turn the Imperials take out the damaged Strix with a salvo, while the remaining cruiser makes an aggressive move towards the St Petersburg heavy cruisers and engages with more closed action weapons. The xeno battlecruiser, Basilisk, follows up behind and finishes off the New Cairos with support from the Djinn frigates moving up to support.

End of turn 2, the close action frigates and main battlegroup of the xenos move across the table to support while in the Imperials still have a battlegroup in reserve  on their left moving into the fray.

The Basilisk finds itself in a bad position and attracts the attention of the Atlantis taking heavy damage from multiple ships. Meanwhile the Strix does it's best to damage the Moscow before going down to combined fire from lasers and turrets.

The Djinns move up to close range and finish off the St Petersburg with their close action weapons. The Imperial right flank has seen both sides take heavy losses as the field opens up.

Meanwhile on the other side of the table the pair of Rio cruisers supported by Toulons move in on the flank of the Xenos.

At the end of Turn 3, the untouched Imperial battlegroup focuses fire on the Hydra and takes it out as the Xeno heavy cruiser, Shenlong moves in to finish the Atlantis, the Imperials flagship.
 
The Shenlong goes weapons free and takes out the Atlantis, the admiral of the Imperial Fleet, Clive Owen, goes down with his ship in a burning wreck.

Second to last turn and the xeno fleet defending the hive ship have been wittled down to the last remaining ship, the Imperials have also lose a significant number of heavy ships but are in better position to finish things off.
 
Instead of going for the mother ship as the mission dictated, the last intact Imperial battlegroup decided to exact revenge for the loss of their admiral and attack the remaining xeno ships.

The game ended in an effective draw, the Imperial side had one more victory point based on kill points, however they failed to destroy or damage the mother ship, a critical location. The invasion has been repulsed but the xeno hive mind was still in tact and able to escape the galaxy.

Some closing thoughts on the game and the campaign:
- This is the last official battle in the campaign, but don't worry there will be an epilogue and other campaigns I have brewing in my mind in the near future.
- As the xeno (Scourge) player I have struggled in these space battles with positioning myself correctly, I think the Imperial fleet (UCM) are much more forgiving in their play style but also less deadly.
- I wanted to try playing DCF without ground assets and in some ways I prefer it this way. Less mechanics to worry about, faster game that still retains the tactical feel of orbital layers, different weapons systems and signatures. I still like the option of having ground objectives, it adds variety to a genre of games that can get repetitive and stale, however I sometimes think the ground game can dominate the game too much whereas I prefer spaceships blowing each other up.
- Thanks to all those who viewed this page and liked the links on facebook.